The AxiDraw Drawing Machine (Legacy version)
[This documentation is for the first-generation legacy-model AxiDraw, sold prior to February 2016, with white Delrin chassis. Please Click here for information about current AxiDraw models.]Making your first drawing
It's time to start drawing!
Draw something in Inkscape
Open Inkscape - a new document will be created automatically.
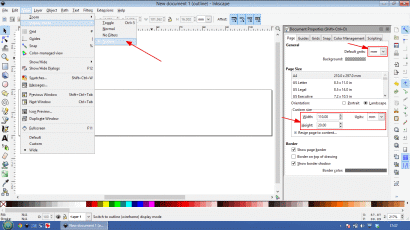
Next, specify the page dimensions and units. Go to File -> Document properties. Set Default units to mm. Under Custom size enter Width 110, Height 20, and choose mm for the Units. You can use any units (inches, mm, cm etc.) - the WaterColorBot extensions automatically handle conversions. From the View menu, choose Display mode -> Outline, then Zoom -> Page. Here's a screenshot with the relevant areas highlighted (click to enlarge):
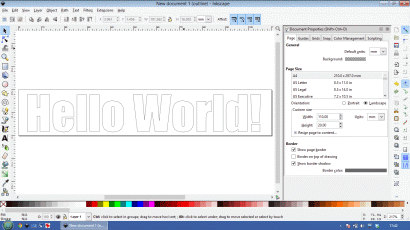
Now let's draw some text. Click the text tool, choose the Impact font and size 72px (from the drop-down lists at the top of the screen). Click anywhere within the boundary of the page and type some text - in this case we'll use the ever-familiar "Hello World!". With the selection tool, move the text so it's reasonably centered in the page, then choose Object to Path from the Path menu. This converts the text into outline paths, which can be understood by the WaterColorBot extensions. Here's a screenshot so far:
If you're in any doubt, here's a short video clip showing the stages (view in fullscreen HD for full detail):
Set up the AxiDraw and get drawing!
Set the AxiDraw machine on a hard, flat surface and connect both power and computer cables.
The first task is to mount the pen at the correct height in the holder. In Inkscape, open the WaterColorBot control panel from Extensions -> WaterColorBot -> Control WaterColorBot. Go the Manual tab and lower the pen (choose "Lower the brush" from the menu and click Apply). Place a piece of scrap paper on the drawing surface, put the pen in the holder and let it rest on the surface of the paper. Raise the pen slide a few mm by hand, then lightly tighten the pen retaining screw. This ensures that the weight of the pen slide presses down on the pen tip to give reliable drawing. Now, raise the pen (choose "Raise the brush" and click Apply).
To position the pen at the desired starting point, disable the motors from the Manual tab (choose "Disable motors" and click Apply). The slides of the AxiDraw can now be moved by hand. The pen will start at the top-left of the page in Inkscape. Make sure that the slides have enough travel to cover the full page area. If the slides do hit the end stops, no harm will be done to the motors (they will simply skip steps), but the drawing will look rather strange.
Once you're satisfied with the starting position, place a sheet of paper on the drawing surface and secure it with a couple of weights. Now, from the Paint tab, click Apply to start drawing.
Here's a video of the process:


